Best Practices for Marking Electrical Panels and Components
A professionally built electrical panel is a model of order and precision. Every component has its place, and every wire is run with purpose. Yet, the element that ties it all together is the marking system. Clear, logical, and durable labeling is not a final touch; it is a fundamental aspect of the build that ensures safety, simplifies maintenance, and demonstrates a high standard of workmanship. For electricians and panel builders, effective marking is a non-negotiable part of a compliant and reliable installation.
An inadequately marked panel creates immediate problems. It slows down testing and commissioning, complicates future troubleshooting, and presents significant safety risks to anyone who works on it. This guide provides practical best practices for marking electrical panels and components effectively. We will cover techniques for logical labeling, selecting the right tools for the job, and how Grafoplast solutions provide the reliability and efficiency required for professional results.
The Foundation: A Logical and Consistent Labeling Scheme
Before the first label is printed or applied, you must establish a clear and consistent labeling convention. A logical system is the roadmap to your panel. It allows any technician, whether they were involved in the original build or not, to understand the circuitry and navigate the system with confidence.
Plan Your Identifiers
Your identification scheme should align directly with your electrical drawings. Consistency between the physical panel and the documentation is critical for compliance and efficient fault-finding. Common identification systems include:
- Sequential Numbering: Simple and effective for smaller panels. Each wire is assigned a unique number.
- Grid Reference System: For complex panels, referencing a wire’s origin and destination (e.g., from terminal X1:3 to component Y2:A) provides complete clarity.
- Component-Based Naming: Labels can indicate the component and terminal a wire connects to (e.g.,
PSU-OUT+for the positive output of a power supply unit).
Choose a system and apply it uniformly across the entire project. Mixing and matching conventions will only create confusion. Document your chosen scheme clearly on the first page of your electrical drawings.
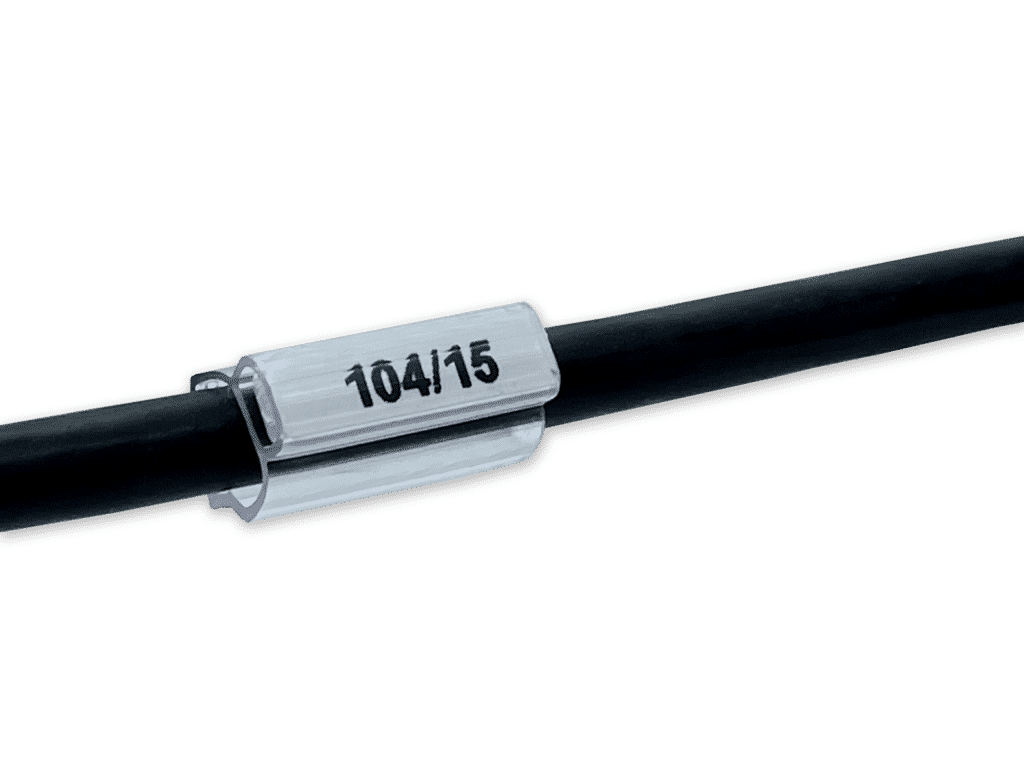
Mark Both Ends of Every Wire
It is an essential practice to mark both ends of every conductor. A label at the source is only half the story. Marking the destination end confirms the connection and eliminates any guesswork during installation or maintenance. This simple step is one of the clearest indicators of a professional wiring job and is invaluable for rapid troubleshooting.
Choosing the Right Marking Tools and Materials
The effectiveness of your labeling system depends heavily on the quality and suitability of the materials you use. The industrial environment demands marking solutions that are engineered for toughness and can withstand exposure to heat, moisture, and chemicals without failing.
For High-Volume Panel Building: Thermal Printing
For switchboard manufacturers and professionals building large or multiple panels, efficiency is paramount. The Grafoplast EVOMAX Thermal Printer is the definitive tool for high-volume marking.
- Speed: The EVOMAX prints thousands of markers quickly, drastically reducing the labor-intensive process of manual labeling. This allows your team to focus on assembly and wiring, improving overall project throughput.
- Durability: The thermal transfer process creates markings that are exceptionally resistant to smearing, fading, and abrasion. This ensures permanent legibility, even in harsh industrial settings.
- Versatility: With the EVOMAX, you can produce custom markers for all panel components, including wire tags, terminal block strips, equipment labels, and push-button identifiers. This flexibility ensures a consistent, professional look across the entire panel.
For Custom Builds and On-Site Work: Manual Systems
For custom one-off panels, maintenance tasks, or on-site modifications, a flexible manual system is often the most practical choice. The Grafoplast TRASP system is the industry standard for this application.
- Precision: The pick-and-place system allows for precise, individual character application, perfect for detailed or custom identification needs.
- Flexibility: TRASP® can be used before or after termination. With slide-on sleeves for new wiring and snap-on sleeves for retrofits, you have a solution for every scenario.
- Convenience: The system is fully portable, making it ideal for field service and repair work where you need a reliable marking solution on hand.
Techniques for Marking Specific Components
A complete marking strategy addresses every element within the electrical panel. Here are specific techniques for key components.
Wires and Cables
Apply wire markers as close to the termination point as possible for maximum clarity. Ensure the marker is oriented correctly so the text is easy to read without twisting the wire. For multi-core cables, it’s good practice to label the overall cable sheath at its entry and exit points, in addition to marking the individual cores within.
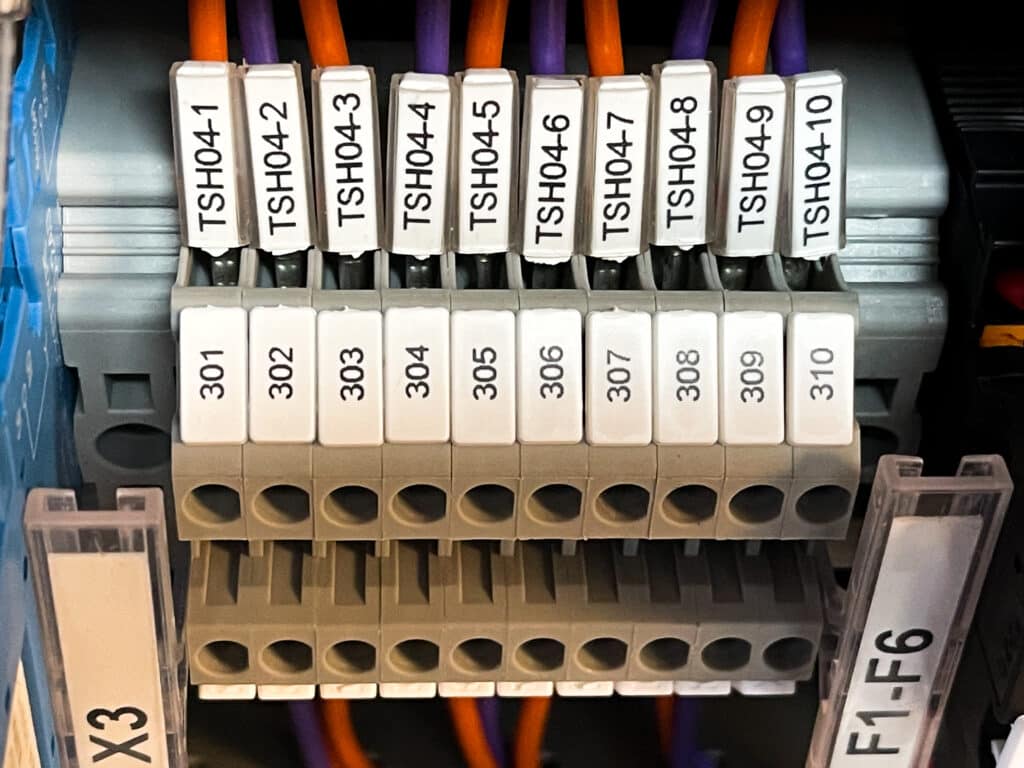
Terminal Blocks
Terminal blocks are critical junction points, and marking them clearly is essential. Use continuous terminal block markers printed with the EVOMAX for a clean, professional appearance. Ensure the identifier on the marker strip corresponds exactly to the wire connected to that terminal. This creates a direct visual link between the wiring and the termination point.
Push Buttons, Switches, and Pilot Lights
Device identification should be clear and concise. The label should state the function of the device (e.g., “Main Power,” “Emergency Stop,” “Pump Running”). Grafoplast offers adhesive labels and name plates specifically designed for this purpose, providing a durable and professional finish that resists wear from frequent use.
Major Equipment and Devices
All major components within the panel – such as power supplies, PLCs, VFDs, and relays – should be labeled according to your electrical drawings. This allows for quick identification during maintenance and troubleshooting. Use durable, adhesive equipment labels that will remain in place for the life of the panel. A well-marked panel allows a technician to quickly locate PLC1 or VFD3 without having to consult the manual every time.
A Mark of Professionalism
Ultimately, your approach to marking is a direct reflection of your commitment to quality and safety. A neatly organized and clearly labeled electrical panel is easier to install, safer to operate, and simpler to maintain. It builds confidence with clients and inspectors, demonstrating a level of professionalism that sets your work apart.
By establishing a logical labeling scheme and using high-quality, application-appropriate tools, you ensure your installations are not just functional, but exemplary. Solutions like the Grafoplast EVOMAX printer and TRASP® system are designed to provide the efficiency and durability that trade professionals demand.
Invest in your marking process. It’s an investment in the safety, reliability, and professionalism of every project you complete.
Explore the complete range of Grafoplast wire and panel marking products today and ensure your work meets the highest standards of quality and compliance.